Trong bài hôm nay mình sẽ hướng dẫn các bạn xây dựng một mô hình mạng nơ ron kết hợp 2 kiến trúc mạng CNN và RNN để giải mã các captcha dạng chữ đơn giản. Giải mã captcha là một bài toán đơn giản trong OCR, mình sẽ sử dụng keras để xây dựng model này một cách dễ hiểu nhất cho mọi người.
1. Dataset :
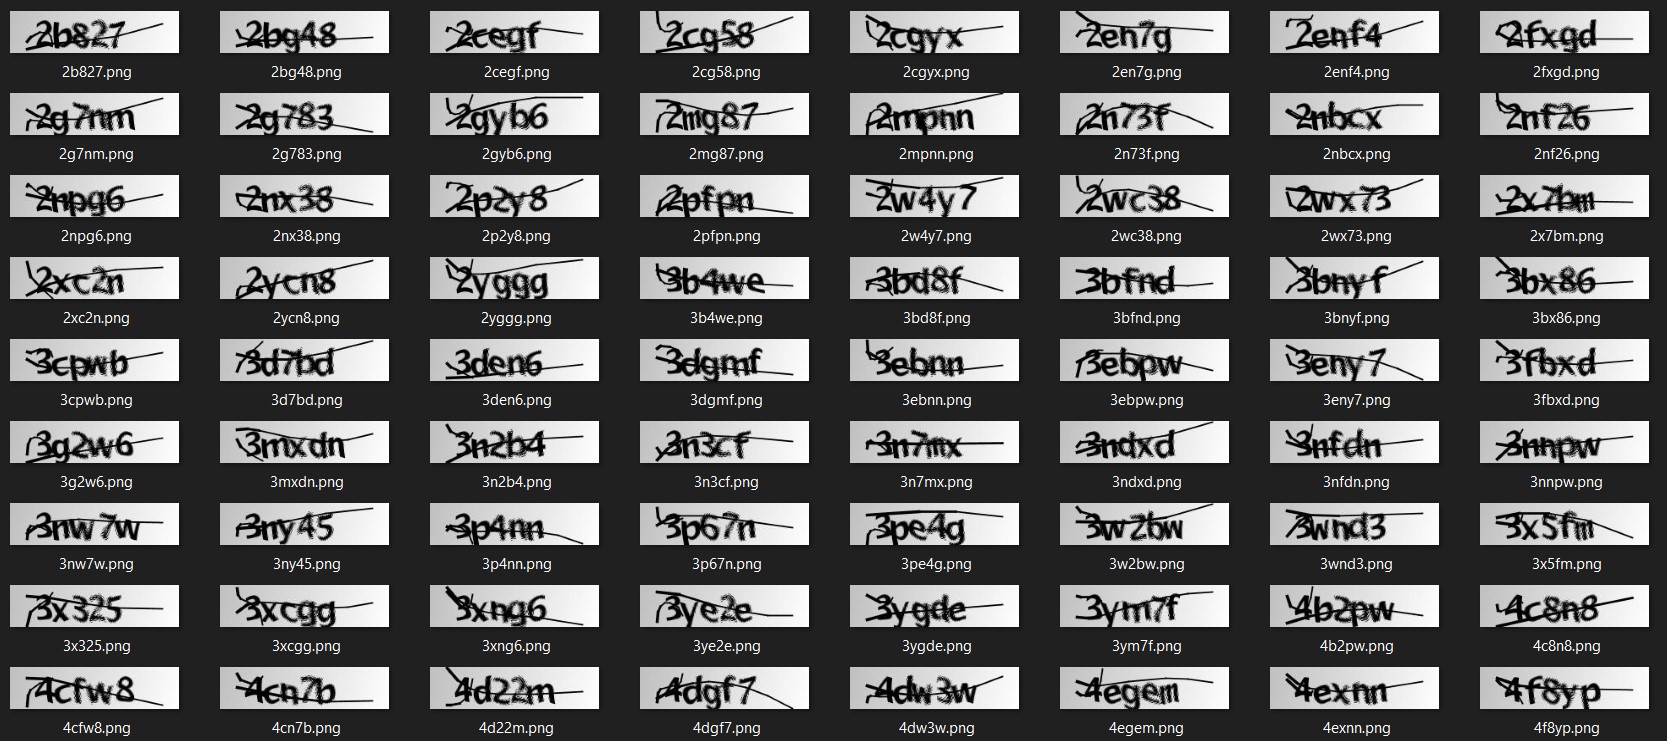
Mình sẽ sử dụng bộ dữ liệu captcha_images_v2 gồm 1040 ảnh định dạng png. Trong đó label cũng là các tên của ảnh, kích thước mỗi ảnh là 200x50 pixel.

Các bạn có thể tải đầy đủ dataset tại đây
2. Import các thư viện cần thiết :
import os
import numpy as np
import matplotlib.pyplot as plt

import tensorflow as tf
import keras
from keras import layers
3. Load dataset :
Vì trong label của ảnh chứa các chuỗi gồm các chữ và các số nên ta sẽ phải ánh xạ các chữ thành 1 chữ số nguyên để training. Sau đó khi dự đoán chúng ta phải ánh xạ lại các số nguyên đó về lại các chuỗi chữ và số.
path = "./captcha_images_v2/"
labels = []
images = []
for file in os.listdir(path):
  label = file.split(".png")[0]
  labels.append(label)
  full_file_path = os.path.join(path, file)
  images.append(full_file_path)

char_ = set(char for label in labels for char in label)

char_to_num = layers.experimental.preprocessing.StringLookup(
    vocabulary=list(char_), num_oov_indices=0
)
num_to_char = layers.experimental.preprocessing.StringLookup(
    vocabulary=char_to_num.get_vocabulary(), invert=True
)
Encoding và decoding :
Máy tính không như chúng ta nó không thể đọc được các hình ảnh và ký tự nên ta cần encode chúng về các dạng ma trận để nó có thể đọc được( Đây gọi là quá trình encode ) trong quá trình training. Tương tự như vậy trong quá trình dự đoán ta vẫn cần phải decode để máy tính trả về các hình ảnh và dự đoán chứ không phải các ma trận số.
def encode_single_sample(img_path, label):
    # 1. Read image
    img = tf.io.read_file(img_path)
    # 2. Decode and convert to grayscale
    img = tf.io.decode_png(img, channels=1)
    # 3. Convert to float32 in [0, 1] range
    img = tf.image.convert_image_dtype(img, tf.float32)
    # 4. Resize to the desired size
    img = tf.image.resize(img, [img_height, img_width])
    # 5. Transpose the image because we want the time
    # dimension to correspond to the width of the image.
    img = tf.transpose(img, perm=[1, 0, 2])
    # 6. Map the characters in label to numbers
    label = char_to_num(tf.strings.unicode_split(label, input_encoding="UTF-8"))
    # 7. Return a dict as our model is expecting two inputs
    return {"image": img, "label": label}


def decode_batch_predictions(pred):
    input_len = np.ones(pred.shape[0]) * pred.shape[1]
    # Use greedy search. For complex tasks, you can use beam search
    results = keras.backend.ctc_decode(pred, input_length=input_len, greedy=True)[0][0][
        :, :max_length
    ]
    # Iterate over the results and get back the text
    output_text = []
    for res in results:
        res = tf.strings.reduce_join(num_to_char(res)).numpy().decode("utf-8")
        output_text.append(res)
    return output_text
4. Chia và tạo object cho các phần dữ liệu:
Bộ dữ liệu của chúng ta gồm 1040 hình ảnh, mình sẽ chia thành 3 phần gồm 80% training, 10% validation, 10% test. Với mỗi tập dữ liệu mình sẽ chia nó thành các object để dễ thao tác.
#chia
x_train = images[:832]
y_train = labels[:832]

x_val = images[832:936]
y_val = labels[832:936]

x_test = images[936:]
y_test = labels[936:]


batch_size = 20
img_width = 200
img_height = 50
max_length = 5

train_dataset = tf.data.Dataset.from_tensor_slices((x_train, y_train))
train_dataset = (train_dataset.map(encode_single_sample).batch(batch_size))

val_dataset = tf.data.Dataset.from_tensor_slices((x_val, y_val))
val_dataset = (val_dataset.map(encode_single_sample).batch(batch_size))

test_dataset = tf.data.Dataset.from_tensor_slices((x_test, y_test))
test_dataset = (test_dataset.map(encode_single_sample).batch(batch_size))
Xây dựng model :
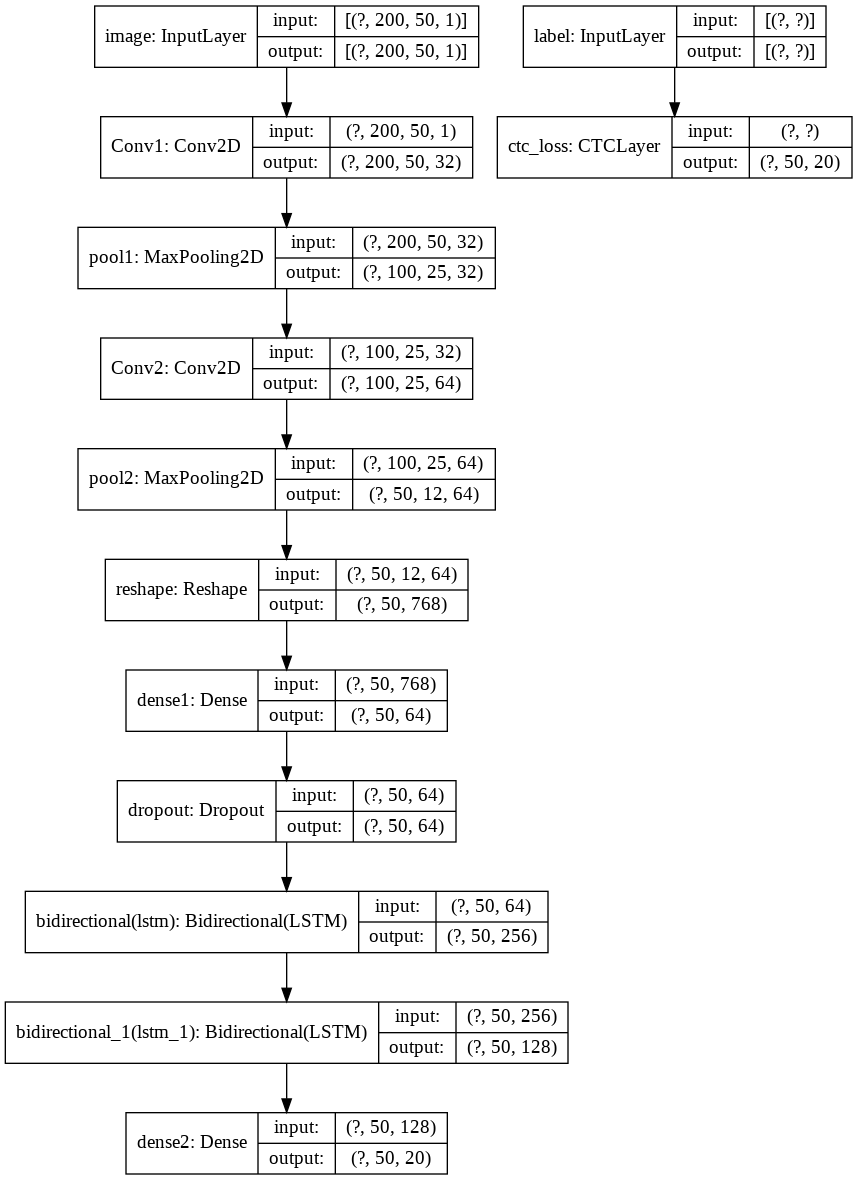
Trong bài toán này mình sẽ xây dựng 1 mạng kết hợp CNN, RNN với đầu ra là một lớp CTC loss. Cấu trúc bài toán được mô tả đây đủ trong hình dưới đây :

class CTCLayer(layers.Layer):
    def __init__(self, name=None):
        super().__init__(name=name)
        self.loss_fn = keras.backend.ctc_batch_cost

    def call(self, y_true, y_pred):
        # Compute the training-time loss value and add it
        # to the layer using `self.add_loss()`.
        batch_len = tf.cast(tf.shape(y_true)[0], dtype="int64")
        input_length = tf.cast(tf.shape(y_pred)[1], dtype="int64")
        label_length = tf.cast(tf.shape(y_true)[1], dtype="int64")

        input_length = input_length * tf.ones(shape=(batch_len, 1), dtype="int64")
        label_length = label_length * tf.ones(shape=(batch_len, 1), dtype="int64")

        loss = self.loss_fn(y_true, y_pred, input_length, label_length)
        self.add_loss(loss)

        # At test time, just return the computed predictions
        return y_pred


def build_model():
    # Inputs to the model
    input_img = layers.Input(
        shape=(img_width, img_height, 1), name="image", dtype="float32"
    )
    labels = layers.Input(name="label", shape=(None,), dtype="float32")

    # First conv block
    x = layers.Conv2D(
        32,
        (3, 3),
        activation="relu",
        kernel_initializer="he_normal",
        padding="same",
        name="Conv1",
    )(input_img)
    x = layers.MaxPooling2D((2, 2), name="pool1")(x)

    # Second conv block
    x = layers.Conv2D(
        64,
        (3, 3),
        activation="relu",
        kernel_initializer="he_normal",
        padding="same",
        name="Conv2",
    )(x)
    x = layers.MaxPooling2D((2, 2), name="pool2")(x)

    new_shape = ((img_width // 4), (img_height // 4) * 64)
    x = layers.Reshape(target_shape=new_shape, name="reshape")(x)
    x = layers.Dense(64, activation="relu", name="dense1")(x)
    x = layers.Dropout(0.2)(x)

    # RNNs
    x = layers.Bidirectional(layers.LSTM(128, return_sequences=True, dropout=0.25))(x)
    x = layers.Bidirectional(layers.LSTM(64, return_sequences=True, dropout=0.25))(x)

    # Output layer
    x = layers.Dense(len(char_) + 1, activation="softmax", name="dense2")(x)

    # Add CTC layer for calculating CTC loss at each step
    output = CTCLayer(name="ctc_loss")(labels, x)

    # Define the model
    model = keras.models.Model(
        inputs=[input_img, labels], outputs=output, name="ocr_model_v1"
    )
    # Optimizer
    opt = keras.optimizers.Adam()
    # Compile the model and return
    model.compile(optimizer=opt)
    return model

model = build_model()
model.summary()
Training :
mình sẽ training 50 epochs các bạn có thể training nhiều hơn nếu muốn cải thiện độ chính xác
history = model.fit(
    train_dataset,
    validation_data=val_dataset,
    epochs=50
)
predict :
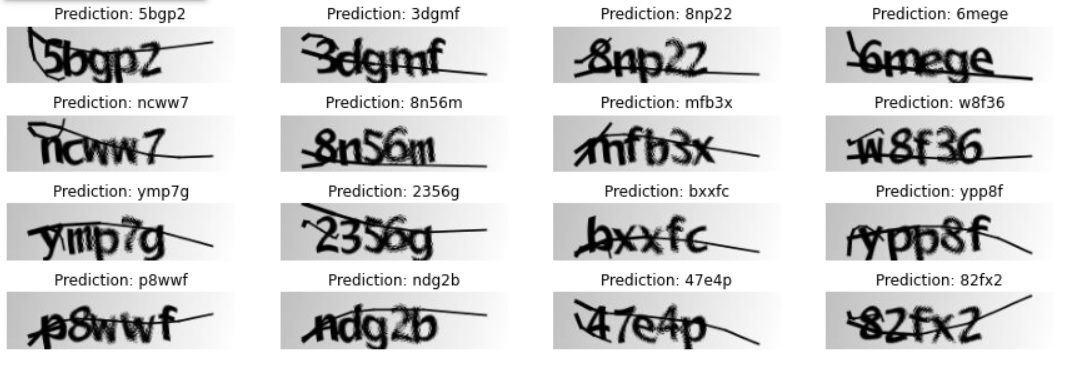
Mình sẽ predict các captcha chưa trong tập test_dataset
prediction_model = keras.models.Model(
    model.get_layer(name="image").input, model.get_layer(name="dense2").output
)
prediction_model.summary()

for batch in test_dataset.take(1):
    batch_images = batch["image"]
    batch_labels = batch["label"]

    preds = prediction_model.predict(batch_images)
    pred_texts = decode_batch_predictions(preds)

    orig_texts = []
    for label in batch_labels:
        label = tf.strings.reduce_join(num_to_char(label)).numpy().decode("utf-8")
        orig_texts.append(label)

    _, ax = plt.subplots(4, 4, figsize=(15, 5))
    for i in range(len(pred_texts)):
        img = (batch_images[i, :, :, 0] * 255).numpy().astype(np.uint8)
        img = img.T
        title = f"Prediction: {pred_texts[i]}"
        ax[i // 4, i % 4].imshow(img, cmap="gray")
        ax[i // 4, i % 4].set_title(title)
        ax[i // 4, i % 4].axis("off")
plt.show()
Và đây là thành quả :

Như vậy qua bài này mình đã hướng dẫn các bạn xây dựng 1 bài toán OCR đơn giản, mọi người có thể chạy code tại đây
Tài liệu tham khảo :
1: https://www.kaggle.com/fournierp/captcha-version-2-images
2: https://www.dlology.com/blog/how-to-train-a-keras-model-to-recognize-variable-length-text/